In the previous blog, we have already explored prebuilt AI prompts that are offered by Microsoft which can be integrated further with Power Automate to make our lives easy.
In this blog let us focus on how we can create custom AI prompts as per our need which can be used further in Power Automate to achieve specific requirements by referring to the above provided blog link.
Custom prompts provide the flexibility to create our prompt from scratch as per the business need and pass those as input for instructing the GPT AI model to perform the specific tasks more intelligently. You can refer to this MS doc for more details about how to create a custom prompt.
NOTE: This feature is still in PREVIEW and available only for limited regions. You can refer to this MS doc for more details.
Let us now create a custom AI prompt by considering the use case explained later.
From the Maker Portal https://make.powerapps.com/ under AI Builder > you can navigate to AI prompts, then click on “Create text using custom prompt” as shown below:
NOTE: If you are not able to see “AI Prompts” in the left navigation pane of Power Apps then click on “Discover” and search for the same and pin it for quick navigation.
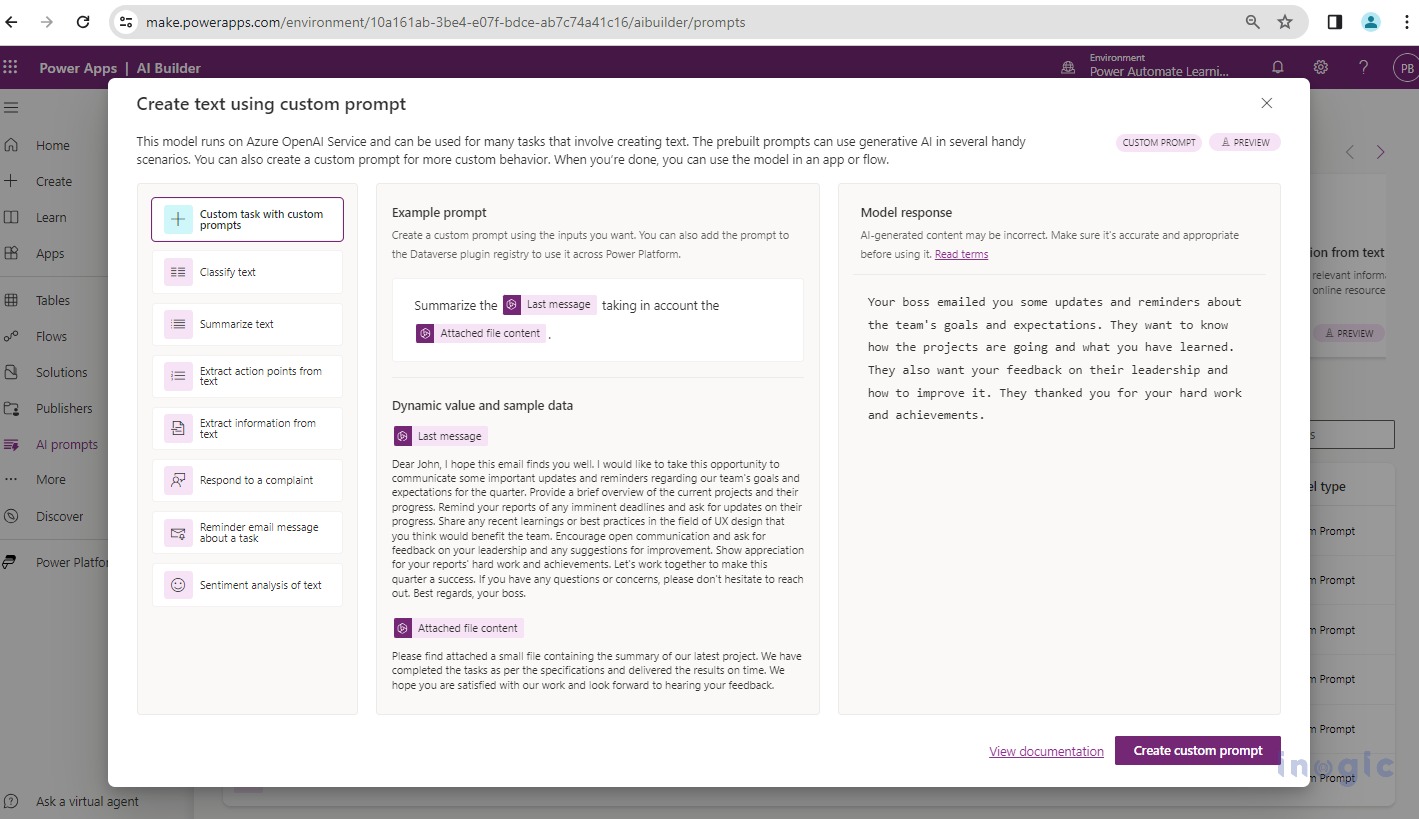
Once clicked on it prompt builder pop-up opens up as shown below which shows you a few prebuilt AI prompts provided by Microsoft, you can start using one of them right away as a starting point to understand AI Prompts OR you can modify them further as per your business need.
Alternatively, you can always create your custom prompt from scratch by clicking on the button “Create custom prompt”.
Microsoft has offered below prebuilt AI prompts so far which can be used as templates as it covers the common use cases scenarios.
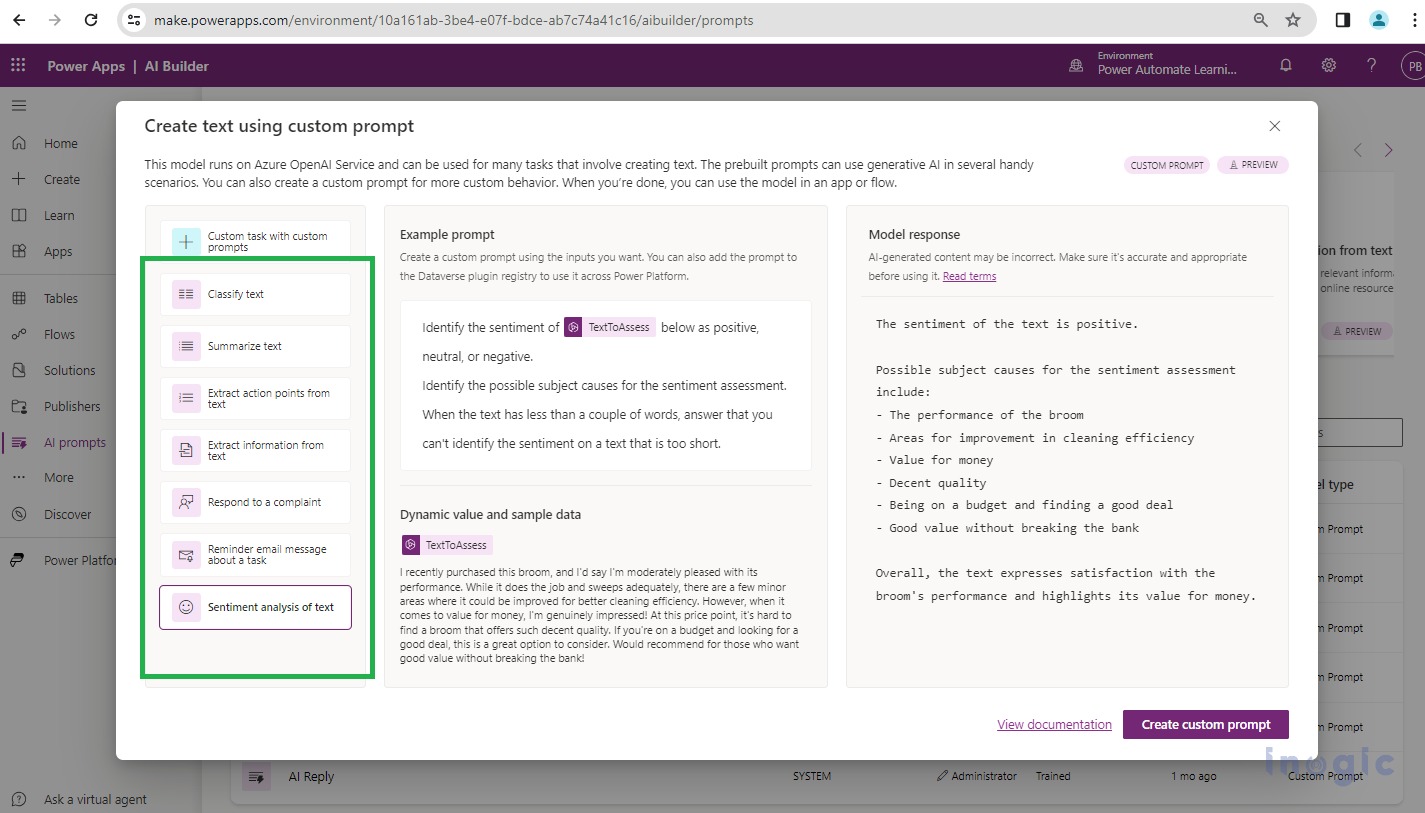
I have selected the “Sentiment analysis of text” prompt from the list as below, upon selecting the same on the right-hand side you will observe details of that prompt in 3 parts as below:
Instruction is the first part of the prompt, consisting of 1 or more dynamic values and it instructs the GPT model what it should do exactly
Dynamic value input and sample data where actual input is provided is defined and passed over instruction
The corresponding response generated by the model based on the provided input
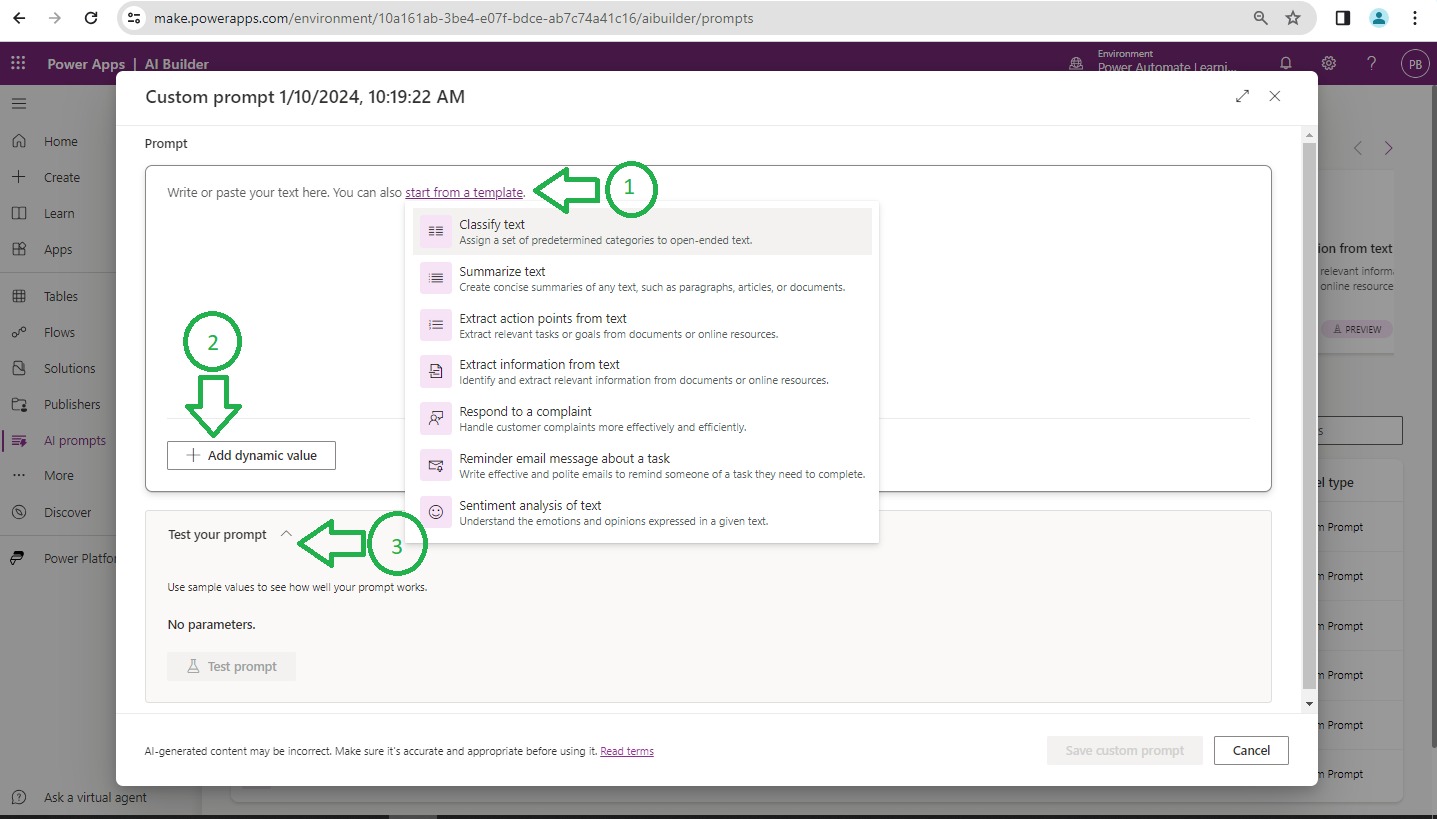
Upon clicking on “Create custom prompt” > A blank AI Builder prompt window opens up as shown below:
As highlighted with #1 above, you can choose AI prebuilt templates from the list if needed. Note: For this demonstration, I am skipping it and would like to continue from scratch.
As highlighted with #2 above, from within the AI prompt builder you can add dynamic value.
As highlighted with #3 above, from within the AI prompt builder you can test the prompt response by providing the sample value, and once you are happy with the result you can save the AI prompt.
Let us create an AI prompt from scratch and implement the use case below:
Use case:
As a QA Manager, I want to build an AI prompt that will evaluate the performance of my team quarterly and provide the rating to team members from a 0-5 scale, this evaluation must be done by comparing the feedback captured in meetings with the defined KPIs.
Step 1: The first step is to add the precise instructions, and be more specific while instructing the model what exactly to do. The more you refine your instruction more accurate the response you will get.
You need to spend more time writing the instructions otherwise AI response may not match your expectations then you have to adjust the instructions a little bit and test the AI response again until it matches your expectations. Ideally, good prompts must be “Clear & Concise”, “Specific”, “Contextual”, and “Relevant”. You can refer to this MS doc where effective prompt characteristics are explained in detail.
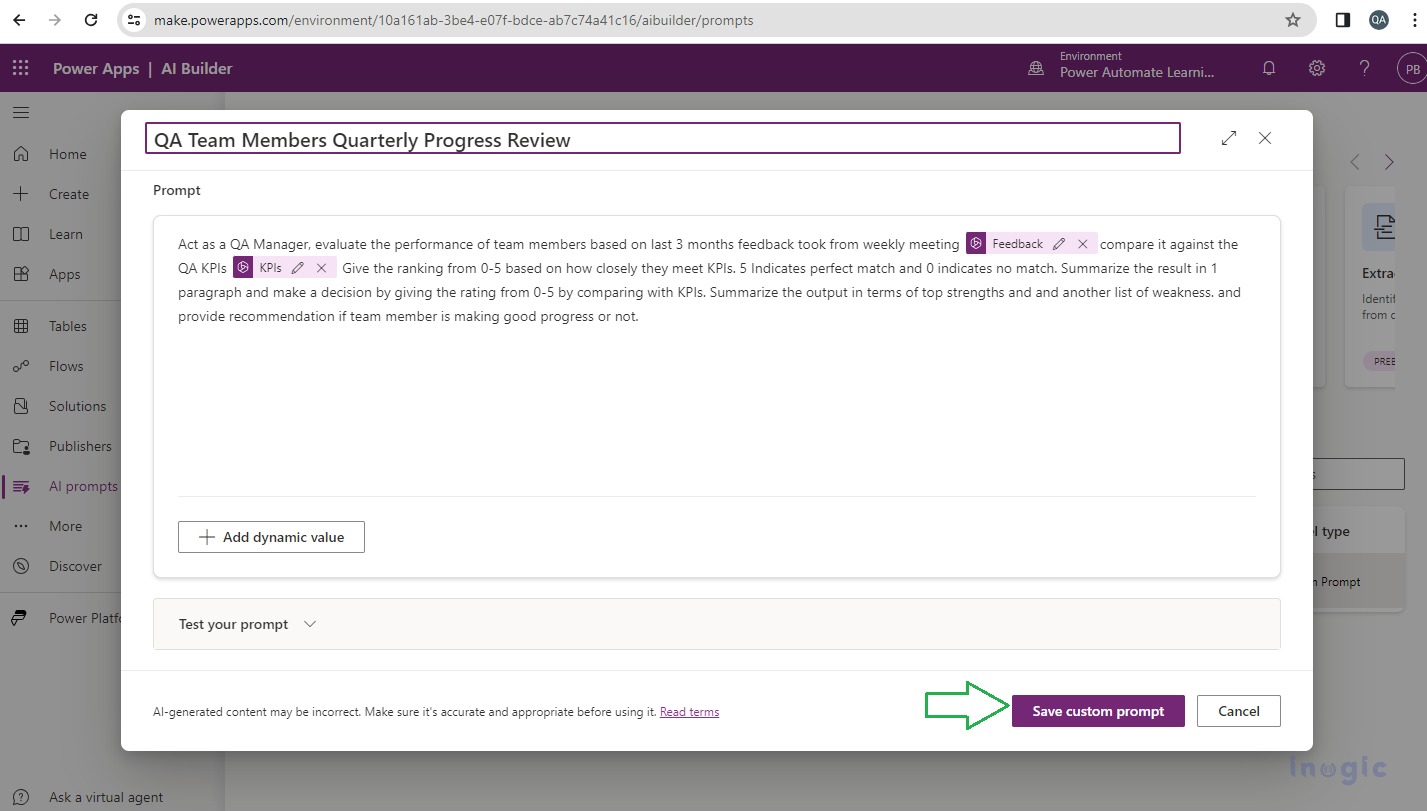
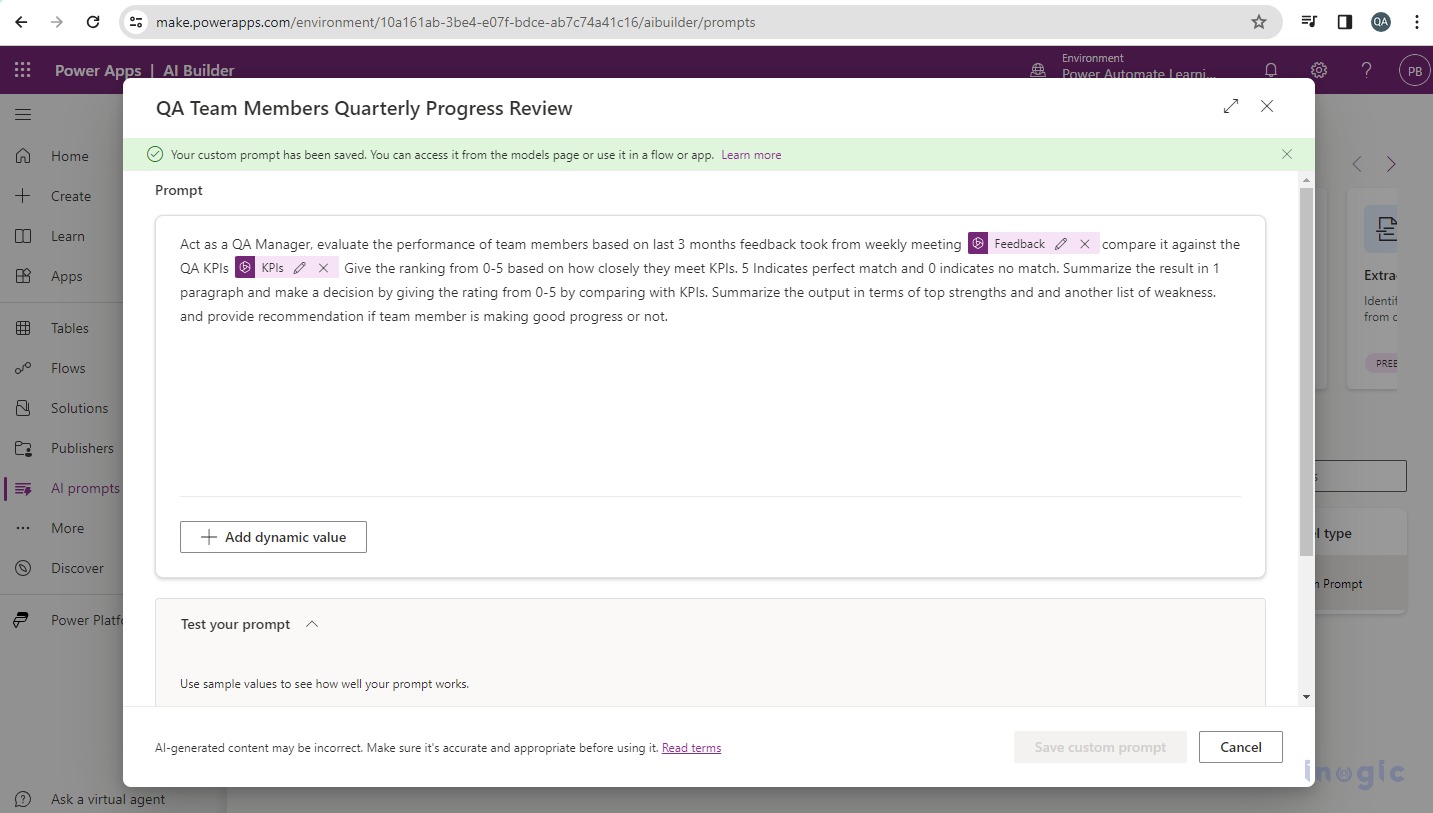
I have added sample prompt instructions as per the use case requirement in below AI prompt section and while doing so I have defined two variables/dynamic values named “Feedback” and “KPIs” respectively as shown below:
I have provided the appropriate name to my prompt as shown above, and then clicked on the “Save custom prompt” button.
NOTE:
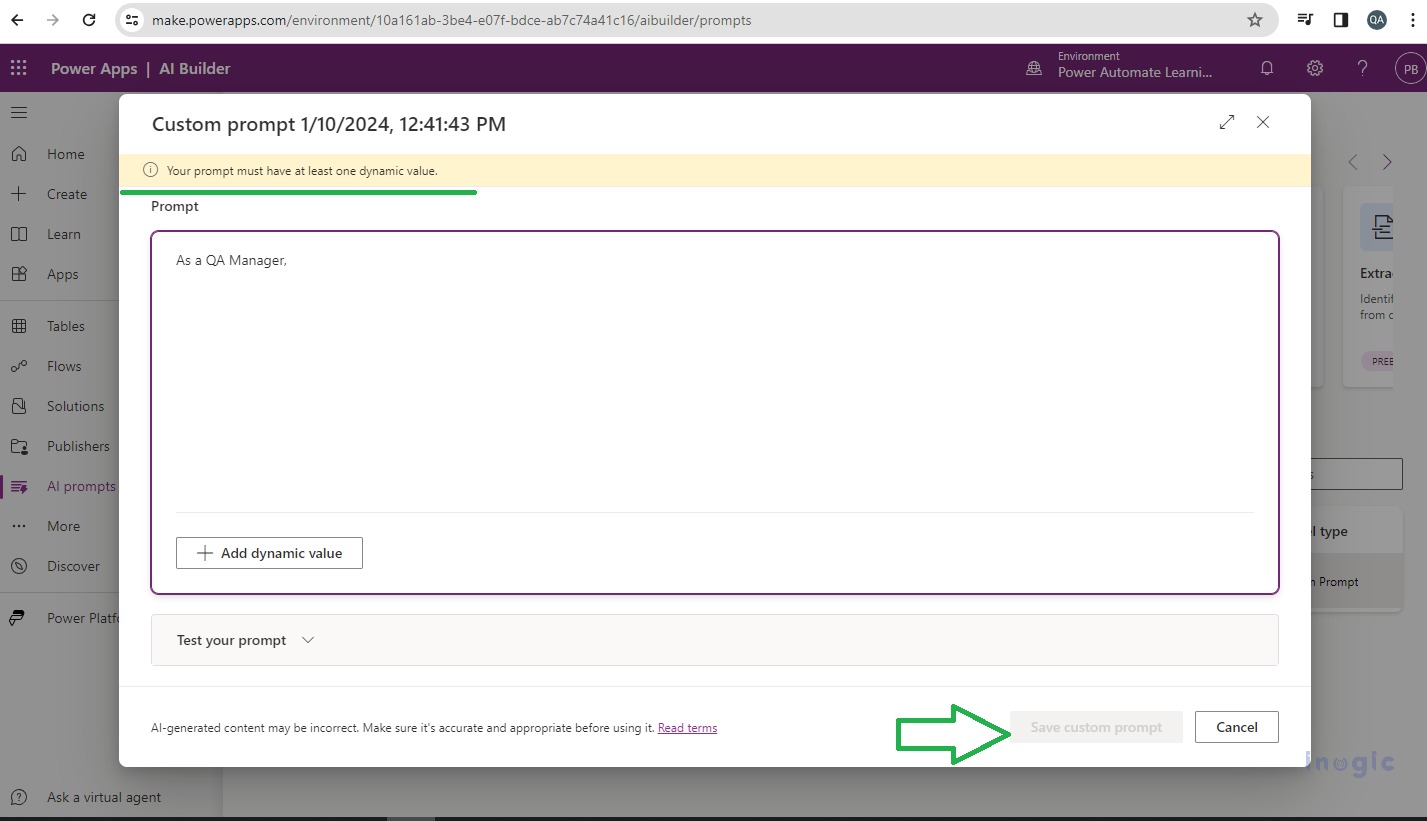
You must define at least 1 dynamic value when you are creating the instructions for saving the prompt, you will observe when you start writing the instruction warning will appear at the top and you will observe “Save custom prompt” button will be disabled until the Dynamic value is added by using “Add dynamic value” button.
By default, the name of the Custom prompt is set with the format “Custom prompt current date and Time” which can be renamed to any useful name you need.
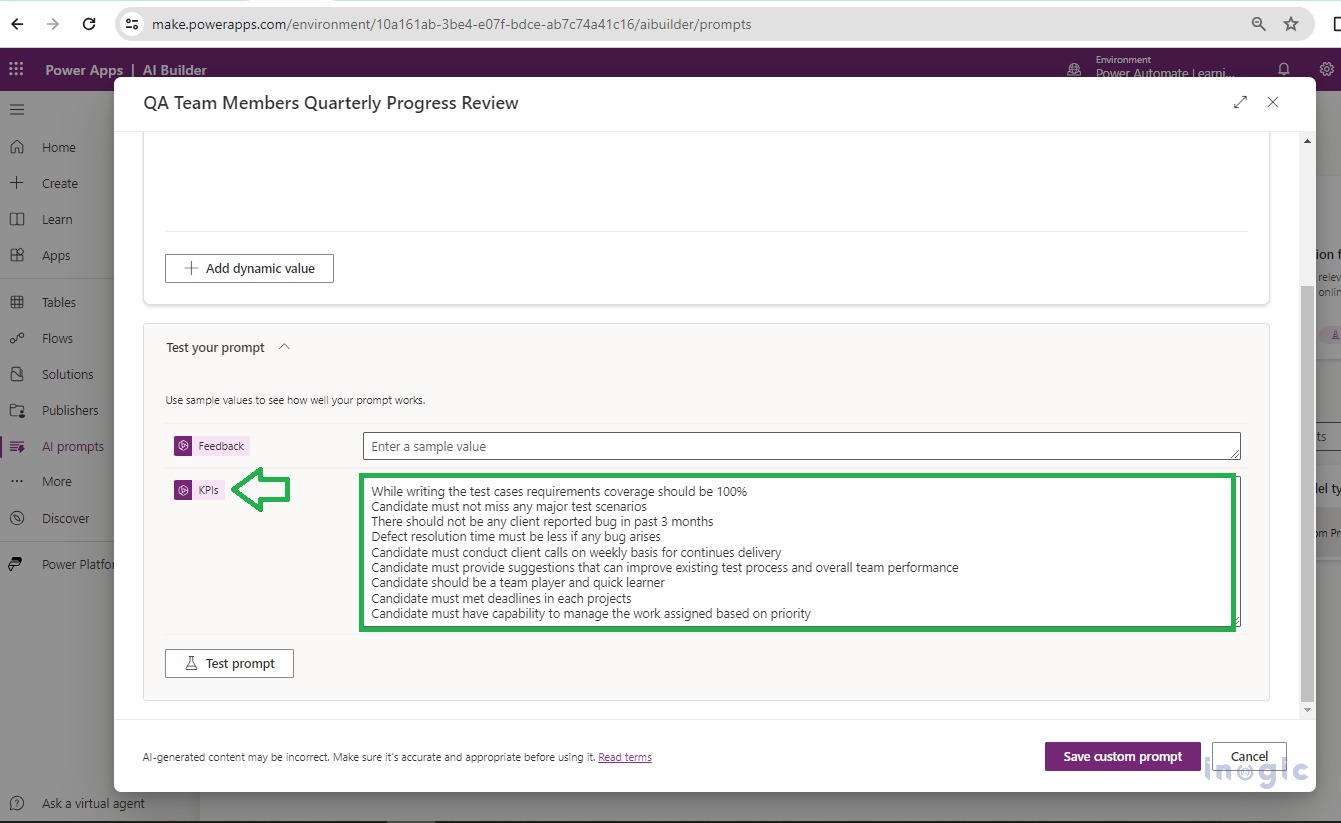
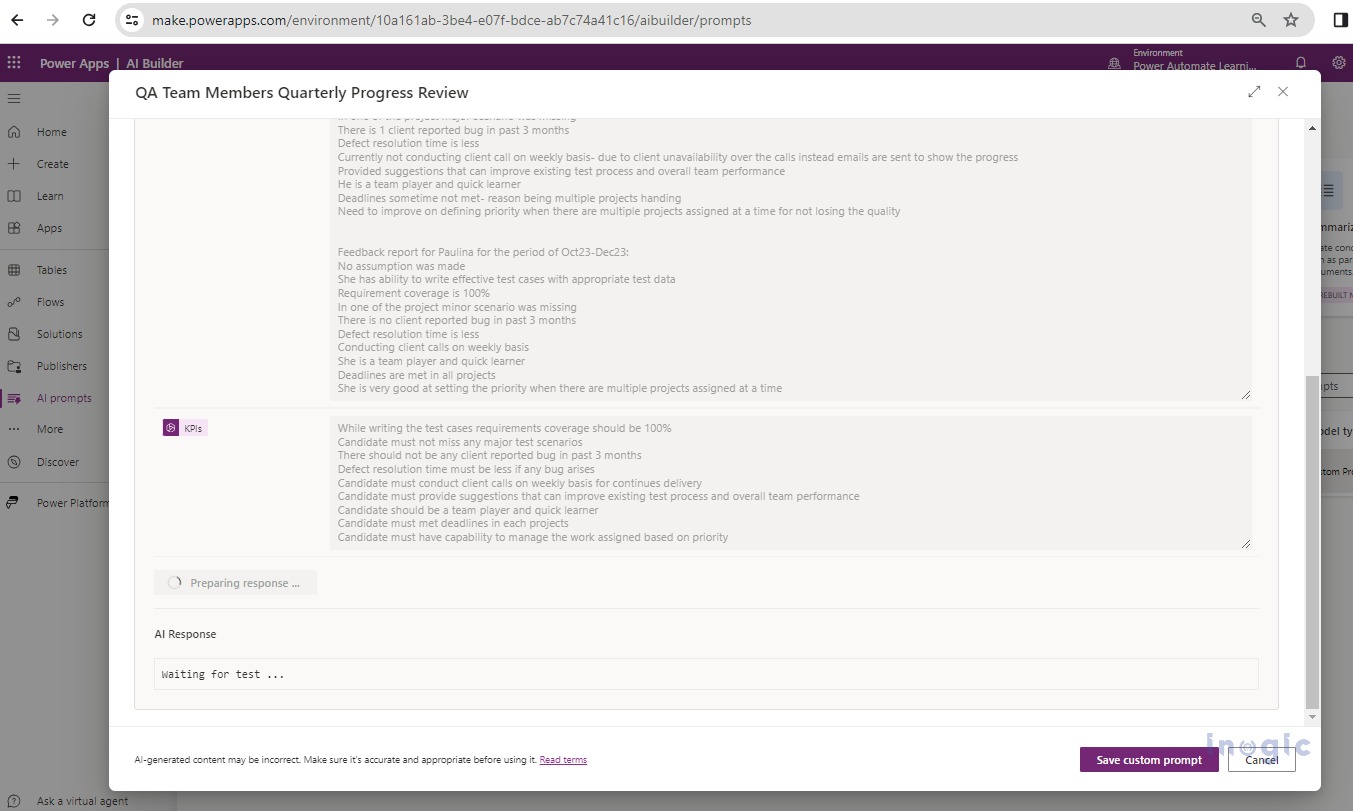
Step 2: The next step is to provide the inputs for defined variables “KPIs” and “Feedback” respectively as shown below:
I have created some KPIs values under the “KPIs” variable which defines the Key Performance Indicators/ characteristics of QA team members which they should meet ideally for higher performance ratings. This “KPIs” variable value is then further used as a metric while comparing against feedback value and generating AI response.
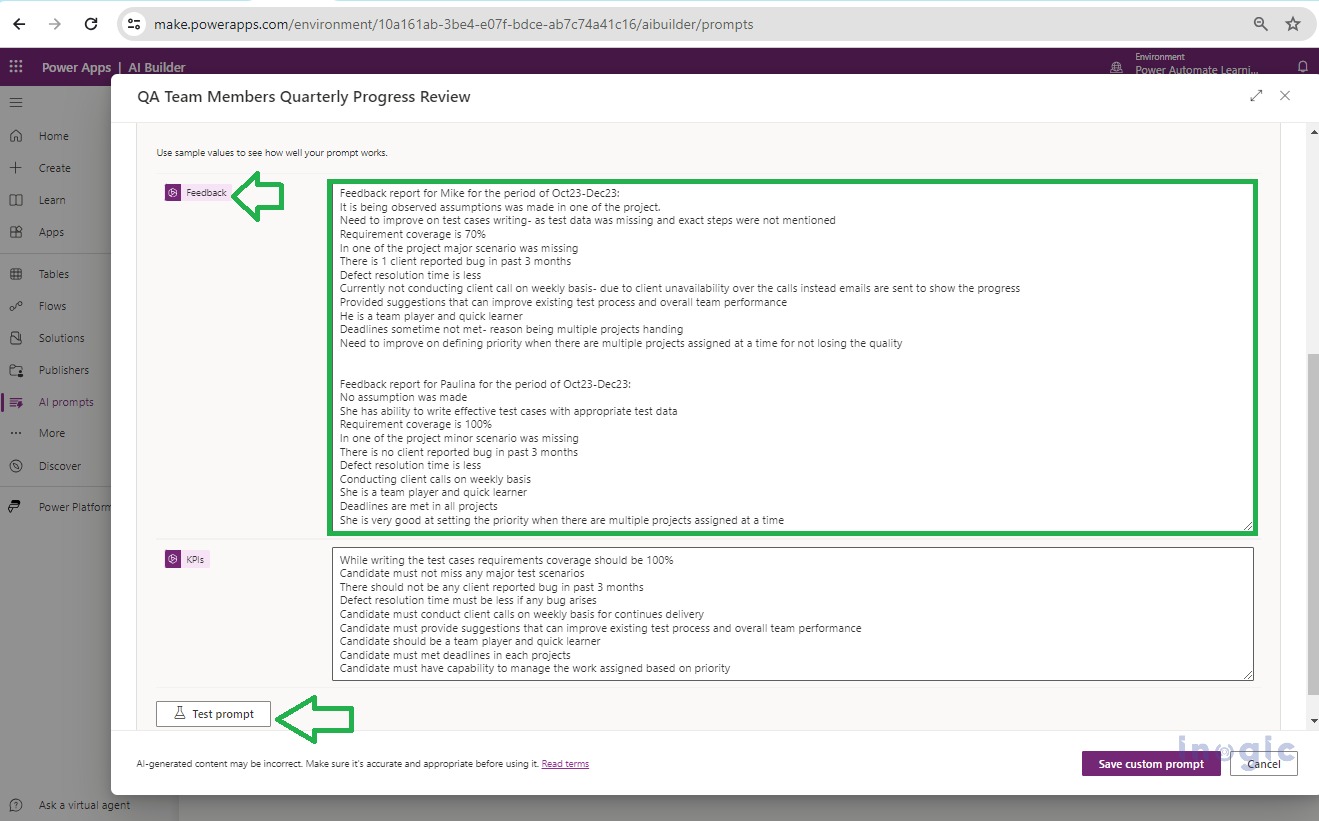
Now enter the “Feedback” variable value, I added feedback comments for Mike and Paulina members respectively as shown below:
Step 3: Now next step is to Test Prompt and validate the AI response
Once done you can click on the “Test Prompt” button just to test it quickly and validate the response on the fly.
You will see below the processing window which shows that an AI response is being generated, it takes hardly a few fractions of seconds to generate it.
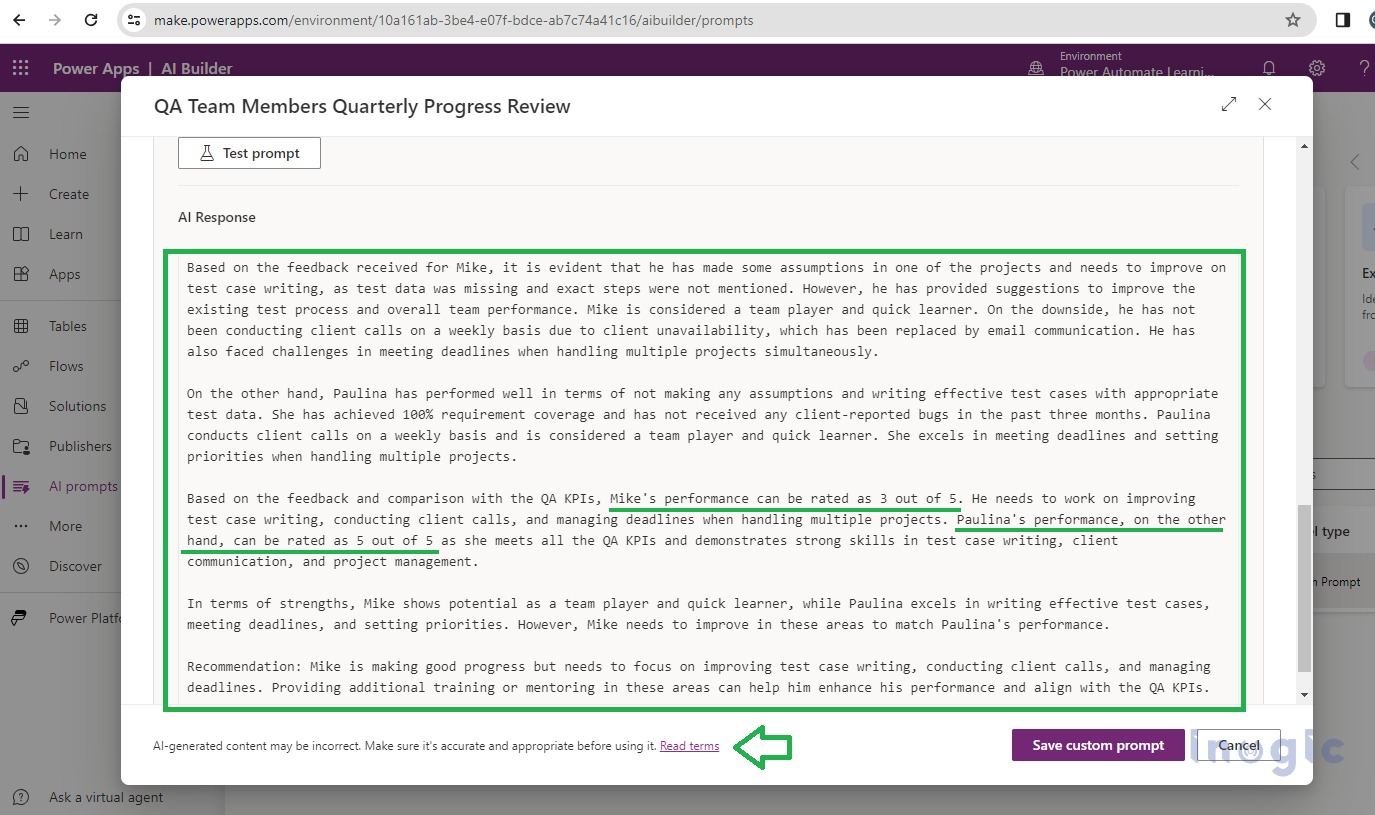
Once generated you can validate the generated AI responses here in “AI Response” section, as shown below:
It gives us the quick summary as underlined in green above, you can evaluate the performance of your team members with a rating quickly.
NOTE: As shown with the arrowhead above there is a note given that this AI-generated response may not be 100% accurate, so it is recommended that before using it further in Power Automate or Power Apps, you first test it in AI Builder only and adjust instructions accordingly which you have provided in #1 until you get the appropriate desire response.
Once you are happy with the generated AI response you can integrate it with Power Automate as per your need.
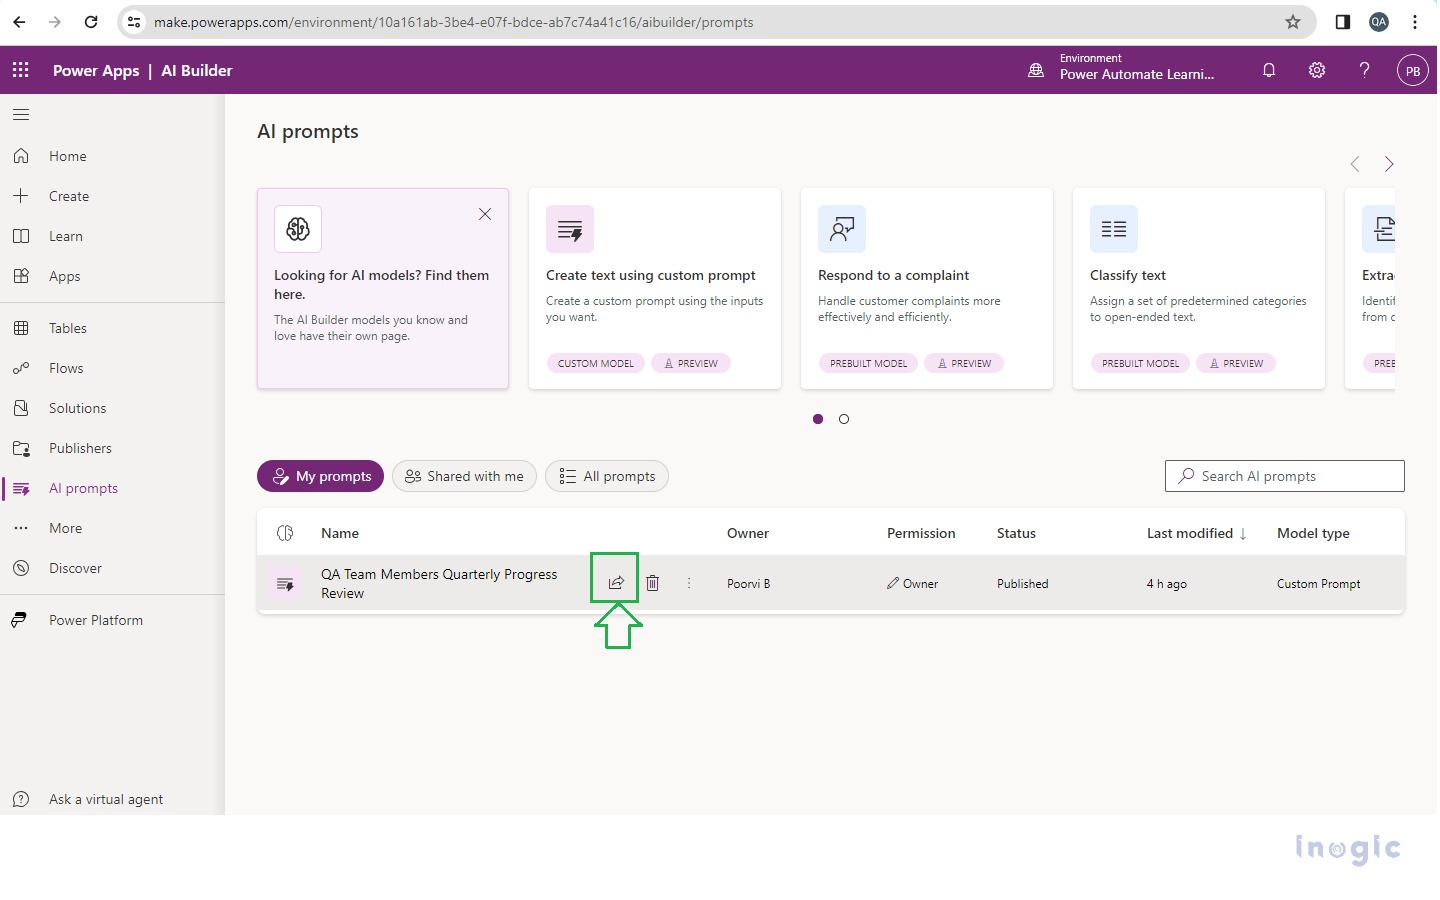
All the saved custom prompts created by you can be viewed from the “My prompts” tab as shown below:
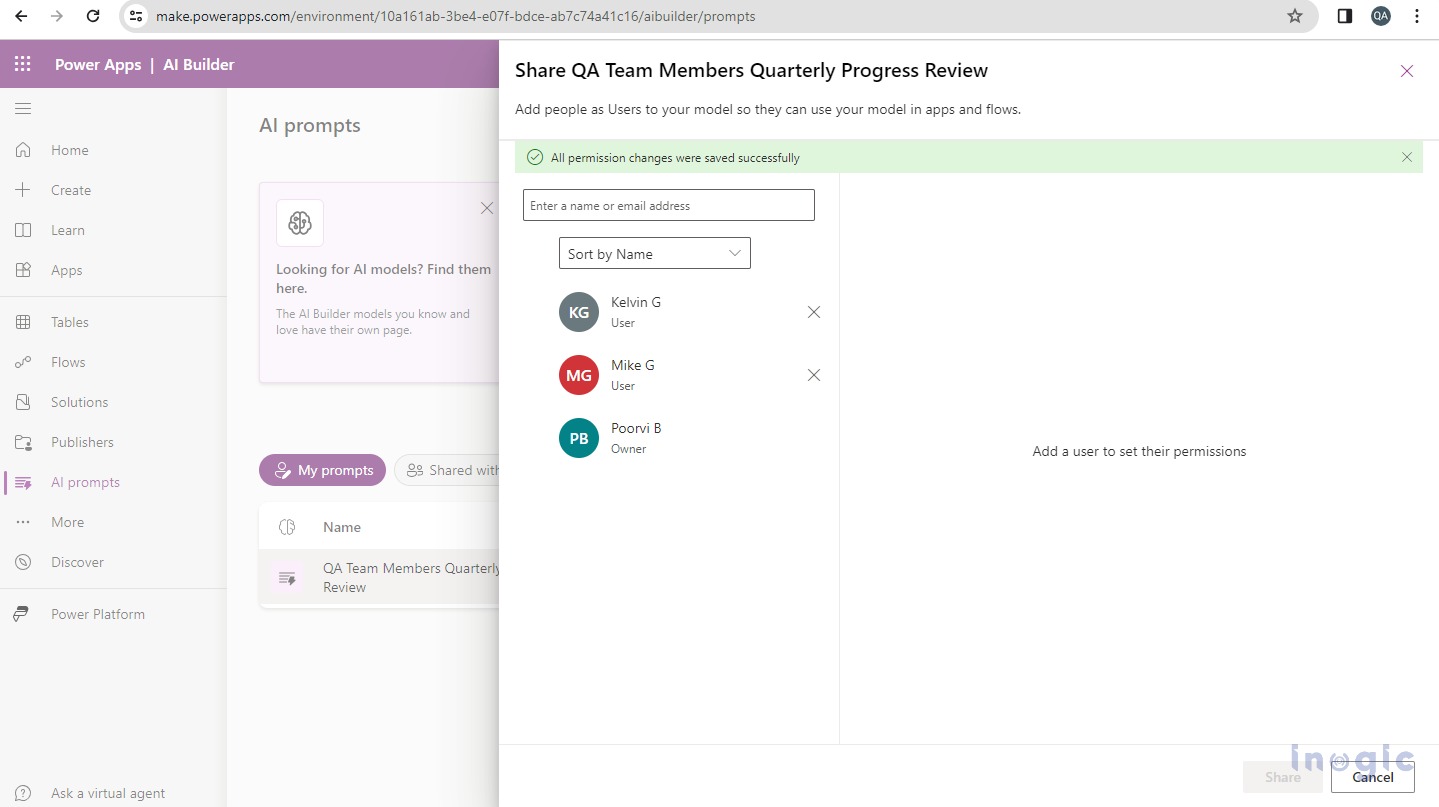
This AI prompt can be shared with another user as well, by clicking on the little share icon shown beside.
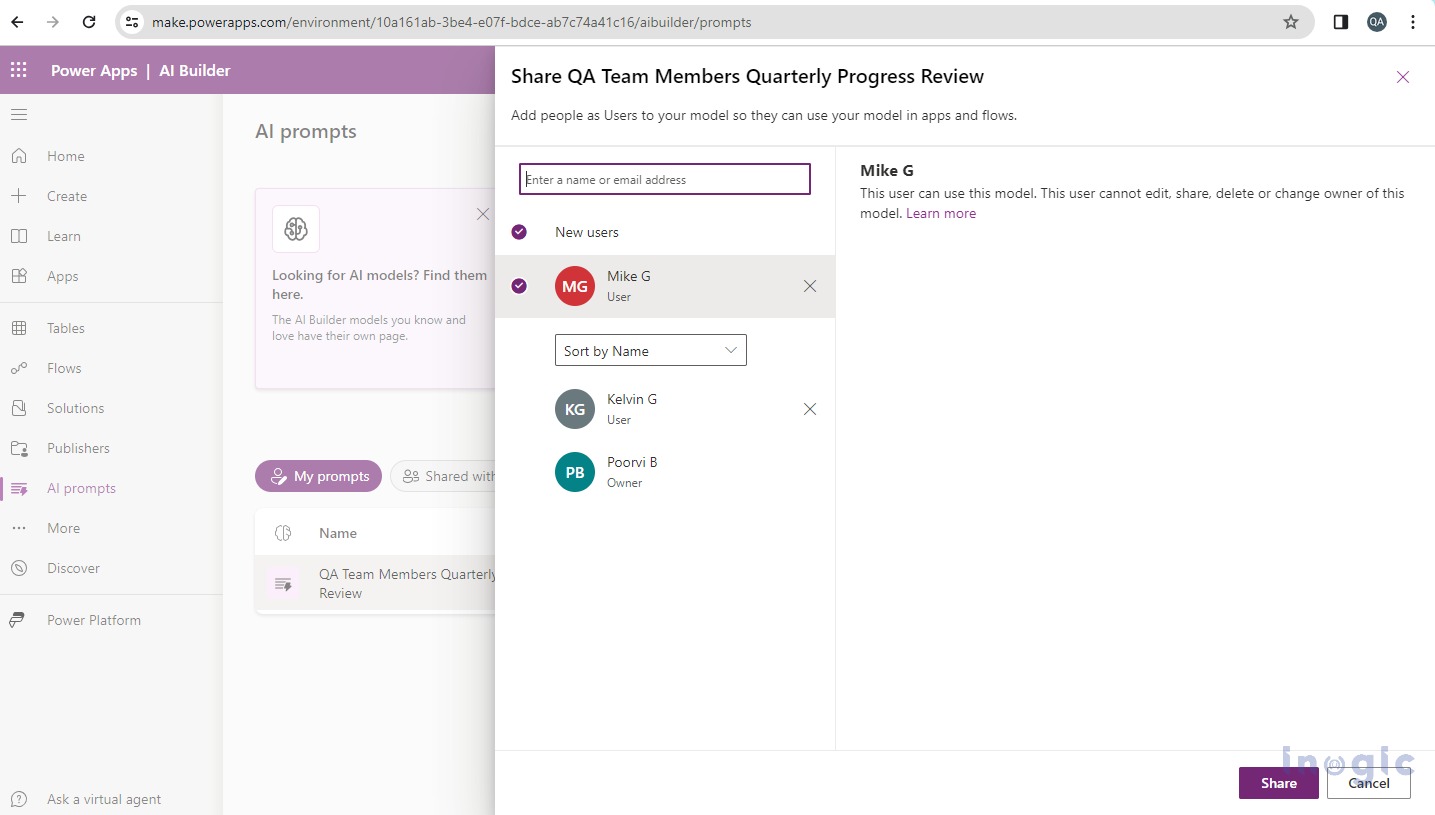
Upon clicking on the Share icon highlighted in the above screenshot, you will find below the share panel pops up where you can search for a user and share the AI prompt.
You can refer to this MS doc for more details regarding sharing the AI model.
Conclusion
With custom AI Prompts, you can now tailor Generative AI capabilities as per your business needs and achieve greater productivity by customizing the provided instructions to any complex level until you get the desired AI response.
